Vim (Advanced Insert) - Finer Text Insertion
Learn how to control where you want to insert text.
Introduction #
In the last tutorial, you learned how to begin using Vim. You learned that Vim is a modal editor. Vim begins in Normal mode, but to edit text, you need to enter Insert mode.
The last tutorial detailed how to enter Insert mode with the i key in Normal
mode.
There are many ways to enter Insert mode and insert text in Vim.
This tutorial will detail more ways you can insert text in Vim.
Requirements #
- A terminal application (e.g. Alacritty)
- Vim
Lack Requirements?
If you lack the requirements, check the previous tutorial for instructions on how to install and get started using Vim.
Getting Started #
Open Vim.
This can be done in a terminal if your system lets you run the vim command.
Otherwise, you should look for gvim.
$ vimThe screen should look similar to this:

If you haven't specified a file name, enter the following command:
:write insert.txtDisclaimer
You might not be able to copy and paste the :write insert.txt command in Vim.
Type the command in its entirety then press <Enter> to execute it.
This command saves the current buffer to a file named insert.txt (as covered
in the previous tutorial).
Standard Insert #
The simplest way to enter insert mode is to press i.
Enter the following:
iThis places the cursor directly before the character that the cursor currently
highlights.
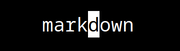
For example, in this setup, pressing i will enter Insert mode and let you
insert characters between the k and d in markdown:
In an empty file, this will let you insert text into the current buffer. Enter the following text in the current buffer:
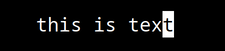
this is textPress <Esc> to leave Insert mode and go back to Normal mode.
The cursor should highlight the last letter in the line, like this:
Cursor Movement
To move the cursor, use the <Up>, <Down>, <Left>, and <Right> arrow keys
to move the cursor one character up, down, left, and right respectively.
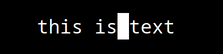
Move the cursor to the space between is and text as shown:
Enter Insert mode with i.
Insert the word "only" after "is" as shown:

Press <Esc> to return to Normal mode.
The cursor should highlight the last letter of "only" as shown:

Insert at Beginning #
To insert a character directly before the first non-whitespace character of a
line, type I (<Shift-i>).
Enter insert mode and move the cursor to directly before the first
non-whitespace character in the line by typing I (<Shift-i>).
The cursor should be placed on the "t" in "this" as shown:

Type "I think" followed by a space. The line should look like the following:

Press <Esc> to switch to Normal mode.
The line should look like this:

Append #
To append text in Vim, use a or A (<Shift-a>).
Both commands are different and place the cursor at different positions.
End of Line #
To add text to the end of the line, press A.
The line should look like this:

Add a period (.) to the end of the sentence by typing ..
The line should look like this:

Press <Esc> to return to Normal mode.
The line should look like this:

After Any Character #
To add text after any character, highlight the character with the cursor in
Normal mode then press a.
You will add don't after I in the beginning of the sentence.
The line should look like this:
To move the cursor to the first letter of the line, press 0.
The line should look like this:

Press a to go into insert mode with the cursor placed directly after the first
"I" in the sentence.
The line should look like this:

Type a space followed by don't.
The line should look like this:

Press <Esc> to switch to Normal mode.
The line should look like this:

Open Line #
To open a line below or above an existing line, use o and O (<Shift-o>).
Both commands are different and open a line in different places.
You will add two sentences on separate lines. The line should look like this:
Open Line Below #
Press o to enter Insert mode and add a line directly below the current line.
The line should look like this:

Type This is a text file followed by a period (.).
The lines should look like the following:

Press <Esc> to return to Normal mode.
The lines should look like this:

Open Line Above #
Press O to enter Insert mode and add a line directly above the current line.
The line should look like this:
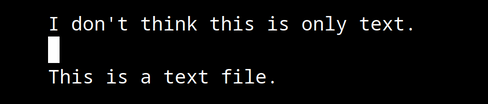
Type This is much more than text followed by a period (.).
The lines should look like this:
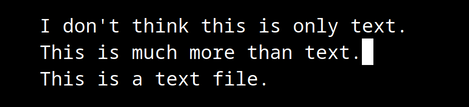
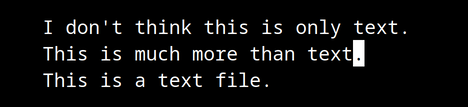
Press <Esc> to return to Normal mode.
The lines should look like this:
Conclusion #
In this tutorial, you learned how to enter insert mode in Vim. You learned how to place your cursor before or after a highlighted character, at the beginning or end of a line, and in a new line directly above or below. With this knowledge, you can control where you want to insert text into a text file, which will enable you to spend fewer keystrokes inserting text.
Vim empowers you to improve your edit workflow. Edits require fewer keystrokes and complexity. Combined with Vim's language-like keybinding design, Vim accelerates and eases your edit workflow.
In future tutorials, you'll learn how to leverage Vim for even more advanced insertion and many more.
License #
This work is licensed under CC BY 4.0.